banner


How To Repair Hydroclean Toilet Fill Valve Problems

Fine Homebuilding Project Guides

Plumbing

How-To

Fixing Toilet Fill-Valve and Flush-Valve Problems

Some toilet valves tin be repaired, others must exist replaced; here'southward how.
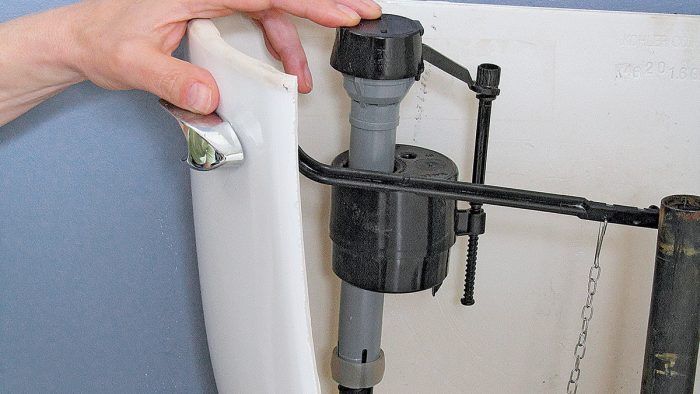
Repairing a Valve

Normally, if a valve leaks or gets clogged and sluggish, the all-time solution is to supercede information technology, because valves are inexpensive. Notwithstanding, it may be worth your while to repair a valve like the one shown hither, because information technology will relieve you the trouble of draining the tank. You may or may not need to replace the rubber parts. Your valve may not look like this one, but the steps are pretty much the same.

Remove the hold-down screws
REMOVE AND INSPECT. Close off water at the finish valve and affluent the toilet. Remove the concur-down screws and pull out the valve'due south top.
Check the rubber parts
Bank check the rubber parts; if any are damaged, supersede them or replace the valve.
CLEAN AND LUBRICATE
Clean AND LUBRICATE. Employ a lint-free, damp cloth to make clean out any debris and mineral buildup. Utilize some plumber'south grease to the parts, and reassemble the valve.

Installing a Fill Valve

Replacing a fill valve is ane of the nearly common toilet repairs, because it takes less than an hour, costs less than $ten, and tin can make your toilet run similar new. Here we show one of the nearly common types of valves, called a float cup, but other types can be installed in much the aforementioned manner.

Other Fill Valves

These fill valves install in much the aforementioned way as shown in the post-obit instructions, with the "critical level" mark 1 in. below the peak of the overflow tube. The white-topped vertical column valve (below left) has a float inside its torso. It can be easily adjusted for meridian after installation. The yellow-and-blackness unit (right) operates much the same manner equally the one shown in the instructions.

Unscrew the supply tube
one. Shut OFF THE WATER AND REMOVE THE NUT. Shut off the h2o at the stop valve and flush the toilet to remove near of the h2o from the tank. Sponge away the residuum of the water. Unscrew the supply tube.
remove the nut
Use a wrench or slip-joint pliers to remove the nut that holds the sometime fill tube in place; it is located under the tank.
REMOVE THE OLD VALVE
2. REMOVE THE OLD VALVE. Disconnect the water inlet (a thin safe tube) from the overflow tube; information technology is usually fastened via a clip that you just pull off. Lift the old fill up valve assembly up and out. (Yours may await unlike from this, and may take merely one tube rather than a tube plus a water inlet, but it probably removes in the aforementioned style.)
CHECK THE OVERFLOW HEIGHT
iii. CHECK THE OVERFLOW HEIGHT. Use a small level to encounter that the top of the overflow tube is about 1 in. beneath the handle's hole.
check that the critical level mark
4. ADJUST THE HEIGHT OF THE FLOAT. Fix the new fill valve in the hole, just do not adhere it however. Use a level to bank check that the critical level mark (usually "CL") on the float is one in. below the top of the overflow tube. This will ensure that h2o rises to 1⁄2 in. beneath the top of the overflow tube.
twist the valve's shank
If the float needs to be adapted, twist the valve's shank to move it up or down.
a rubber washer
v. MOUNT THE VALVE. Once the cup height is secure, slip a rubber washer, positioned equally shown, onto the valve's threads.
Slip the valve into the hole
Skid the valve into the hole in the tank and tighten the mounting nut under the tank.
Clip the water inlet
6. HOOK Up THE H2o SUPPLY. Prune the water inlet and so information technology will shoot into the overflow tube.
give it another quarter turn with pliers
Adhere the supply tube under the tank: Hand-tightening may be tight plenty, but you can give information technology another quarter plough with pliers to be certain. Turn on the water, and test to make sure the water rises to the correct level and that the unit of measurement flushes smoothly.

Dual-Flush Valve

A dual-flush toilet saves water past offering two flush levels: a small-scale flush of nearly 1 gal. for liquid only and a more forceful affluent of i.two gal. to one.6 gal. for solids. You can replace your existing toilet with one that has a dual-flush feature, or yous can salve money and try by retrofitting your electric current toilet with a dual-affluent valve. These valves are at present widely bachelor at hardware stores and home centers.

TIP:The unit shown here is installed at the overflow tube only. Some kits also include a replacement for your fill valve.

REMOVE the HANDLE AND FLAPPER
i. REMOVE the HANDLE AND FLAPPER. Shut off the h2o, flush, and sponge out the remaining water from the tank. Remove the existing handle and flapper.
Disassemble the new valve
2. Detach AND BEGIN INSTALLATION. Disassemble the new valve and slide its lower office down over the overflow tube.
rubber flange that fits into the flush valve seat
It has a rubber flange that fits into the flush valve seat at the bottom of the overflow tube.
slip a plastic cam lock down
3. TIGHTEN THE VALVE. To hold the lower part of the valve in identify, slip a plastic cam lock downwardly onto it.
tighten the zip tie
And so slide downwards a rubber washer and tighten the zip necktie.
ATTACH THE REST OF THE VALVE
4. Adhere THE REST OF THE VALVE. Reassemble the new valve: Place its main torso on peak, press downwards, and rotate until it clicks into place.
INSTALL THE NEW BUTTON
5. INSTALL THE NEW BUTTON. Attach the new handle (or in our case, control push button) into the handle's hole, and tighten a plastic nut (counterclockwise) to secure it. Thread the command wire effectually and then information technology doesn't interfere with the fill valve's water inlet, and slip the command unit of measurement onto the handle, pressing until it clicks into place.
ADJUST FLUSH FORCES
half-dozen. Conform FLUSH FORCES. Clip the water inlet into the top of the fill valve. Test the flushes. If you want flushes to exist stronger, or to apply less water, you can make the adjustments for both types of flushes by simple moving an adjustment bar up or downwards.
TWO BUTTON FLUSHING
Ii BUTTONS. The new control has ii buttons, one for a weak affluent and one for a more powerful flush.

TIP: If the existing flush valve seat is non compatible with the dual-flush valve, you volition need to supervene upon it with one that is uniform.


Excerpted from Plumbing (The Taunton Press, 2022) by Steve Cory.

Sign up for eletters today and get the latest how-to from Fine Homebuilding, plus special offers.

Previous: How to Set up a Running Toilet Next: Replacing the Toilet-Tank Gasket and Overflow Pipage

Plumbing

Get a member and go unlimited site access, including the Plumbing Project Guide.

Get-go Free Trial

Source: https://www.finehomebuilding.com/project-guides/plumbing/fixing-toilet-fill-valve-and-flush-valve-problems

Posted by: carterexproul.blogspot.com

0 Response to "How To Repair Hydroclean Toilet Fill Valve Problems"

Post a Comment

Iklan Atas Artikel

Iklan Tengah Artikel 1

Iklan Tengah Artikel 2

Iklan Bawah Artikel